Learn some helpful IT Administrator tips and tricks.

Welcome to the most comprehensive list of tips and tricks for IT field, you'll find anywhere on the internet. I hope these tips help you get the most out of your internet.

Cloud Computing Next Generation of your company

Benefits of cloud computing is increased efficiency; services are rapidly deployed and ready for use in your company. Find out about the benefits of moving your business to cloud computing....

Support Tips and Tricks

Tips and Tricks for. Learning Before. Helping. Learning. Service. Research Computing... We are ...

Server, Network, System, Application | Diagram

Client-side Examples; Server-side Examples; Client-side Advantages ... this concept is to view the following diagram and considering some examples: ...

Good roadmap for System Engineer, Network Engineer

Roadmap global customer support professionals are focused on crucial, quick issue resolution and uninterrupted service.. HOW?

Friday, March 15, 2013

Enable Role Remote Desktop Web Access

This provides clients an interface to access their virtual desktop. Let's see how to set up Remote Desktop Services on Windows 2008 R2 by enabling Remote Desktop Web Access Role Service.

Use the following steps to install the RD Web Access role service:
  1. Log on to the desired server with local administrator privileges.
  2. Click Start, and then click Run.
  3. In the Run dialog box, type in ServerManager.msc and click OK.
  4. In the Roles Summary section, click the Add Roles task.
  5. After the Add Roles Wizard loads, click Next.
  6. On the Select Server Roles page, select the Remote Desktop Services role, and click Next.
  7. On the Remote Desktop Services page, click Next.
  8. On the Select Role Services page, only select the Remote Desktop Web Access role service. This is the only role service that is being installed at this time.
  9. When prompted with the Add Roles Wizard dialog box, click the Add Required Role Services button (any missing required role services or features for RD Web Access role service will now be added).
  10. On the Select Role Services page, click Next.
  11. On the Web Server (IIS) page, click Next.
  12. On the Select Role Services page, click Next (do not change the defaults).
  13. On the Confirm Installation Selections page, review the selections made, and then click Install.
  14. On the Installation Results page, review the results, and click Close
Connect to the RD Web Access Web site using either of the following methods:
  • On the RD Web Access server, click Start, Administrative Tools, Remote Desktop Services, Remote Desktop Web Access Configuration.
  • Using Internet Explorer, connect to the RD Web Access website using the following URL: https://<server_fqdn>/RDweb as shown in picture below
That is one way to do it, but if you want security in your terminal server implementation, you'd need to install a TS gateway somewhere (preferably on the edge of the network), and then have your clients connect through that so that CAPs and RAPs can be kept in check. The TS gateway service allows for RDP over HTTPS.

VLAN Numbering Standards Design Guide ~ Network, Server, IP phone, PCs

There are no hard and fast rules on how VLANs should be numbered on a campus network. However it is important to choose numbers that mean something and assist the network administrator. For example, vlans will be allocated for normal PC access, IP Telephony, servers and special cases such as inter-switch links.
We recommend that numbers are allocated to a meaningful scheme, such as
  • 100 – 199 allocated to PCs
  • 200 – 299 allocated to IP Telephony voice use
  • 300 – 399 allocated to servers
  • 400 – 499 allocated to security vlans
  • 900 – 999 allocated for special use
This worked design requires the following types of VLANs:
  • Server access VLANs – this is the VLANs which servers will use
  • Security VLANs – used where servers need to be put behind a firewall or IPS
  • Service VLANs – used to attach ILO/console ports or managed power strips to the network
  • “Special” VLANs – used for trunk native VLANs, and other uses that the designer may have. Not used for host attachment.
The previous diagram illustrates VLAN design diagram
This VLAN numbering scheme was implemented in the giant company datacenter design and will be used going forward in this document as a worked example.

VLAN# Description
100-199 Data Users
200-299 IP Phone user
300-399 Server VLANs
400-499 Server VLANs behind transparent firewall
500-599 Server VLANs behind IPS device
600-699 Service /  management Private VLANs (e.g. ILO/Envmon)
700-799 Spare
800-899 Spare
900-999 900 – used for trunk native VLAN, Others used for "system vlans" – e.g. dot1q L3 routed interfaces
1000-1099 Service /  management SVI VLANs (e.g. ILO)
Another approach could be to allocate a VLAN number based on where the access switch is located or the third octet in the IP address. This scheme was typically found in older network designs, and can be impractical if there are a lot of small subnets on the network as essentially it depends on every VLAN being a class C subnet.

The general rule of thumb is that the overall scheme should mean something and be a help rather than a burden to the network administrator.

If this network has to be integrated into an existing network where VLANs have been allocated in a haphazard manner, then it is recommended to follow the above scheme but use the 2000 to 2999 VLAN range (for example, Data Users would be on 2100-2199)

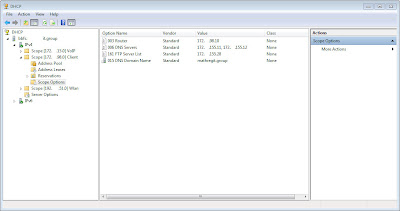
DHCP design guidance for Small Sites (Less than 300 Users)


This article explains the DHCP Server recommendations especially for Small Site (Less than 300 Users). This guidance can be applied to your system.
DHCP Server Configuration
A small site is described as a site with less than 300 users in their facility. Your Management team could the following recommendation design for DHCP. 
  • Option 1 - DHCP on the next uplink site
      In most cases, the scopes configured to cover the mobile sites would include lease times longer than the typical configuration of other DHCP scopes.  This will allow any clients in the remote site to keep their IP address leases active for a longer period of time in the event of poor network connectivity back to the DHCP server.  Any administrative access and management of the actual scopes would need to be addressed with the local site administrators where the NS server is located.
  • Option 2 - DHCP on a local Network Router
      - Network routers are capable of providing DHCP services. This recommends having the local scopes configured on the router.
      - The Network Team manages and creates the DHCP scopes, and any additional required scope\server options.
  • Option 3 - DHCP on a local File/Multifunction server
      The remote site will need to have a local server to host the DHCP scopes.  The local IT administrators would be responsible for IT Compliance of the server, and would need to abide by all rules and regulations put in place by the IT team.
DHCP
For large sites (Greater than 300 users) Sites with more than 300 users are usually recommended to purchase and maintain a local NS server in their facility. You can follow recommendation designs for DHCP as
  • Option 1 - DHCP on a local NS Server  An NS Server is a server which hosts DNS, DHCP, and WINS only.  The dedicated NS box will provide the best performance for most sites with a larger user base.  This will allow for your site to still locally obtain a dynamic IP address, be able to perform administration of DHCP as you currently have rights to do, and provide local caching DNS service to your users, thus reducing the traffic generated by DNS to your local Domain Controller.
  • Option 2 - DHCP on the next uplink site  The recommendation would be to host the local DHCP scopes on the next upstream DHCP server, which in most cases would be the Ehub.
    Any administrative access and management of the actual scopes would need to be addressed with the local site administrators where the NS server is located.
DHCP Messages
DHCP Lease Renewal

DHCP Relay Agent

Saturday, March 9, 2013

Useful Windows tips, tricks and secrets for end-user and administrator

This article describes some cool Windows key tricks to get you started. Here are some of the best tips and tricks for Windows that may help you support/guide/coach the end user.

Calculate more
     Explore the Mode menu and you'll see powerful new Statistics and Programmer views. And if you're clueless about bitwise manipulation, then try the Options menu instead. This offers many different unit conversions (length, weight, volume and more), date calculations (how many days between two dates?), and spreadsheet-type templates to help you calculate vehicle mileage, mortgage rates and more.

Don't take any Windows 7 applet at face value, then - there are some very powerful new features hidden in the background. Be sure to explore every option in all Windows applets to ensure you don't miss anything important.
CALCULATE MORE: The new Calculator is packed with useful features and functionality

Problem Steps Recorder (PSR.exe)
     Step 1) Click start
     Step 2) Type PSR.EXE in start search area
     Step 3) Press Enter
     Step 4) Use pull down arrow and select settings
     Step 5) Select Start and capture whatever you click on and then select stop and save file Into a single zipped MHTML file
     Step 6)  Double click zip to read it.

The command line DISKPART utility:
     This tool to detach a VHD file, and an EXPAND command to increase a virtual disk's maximum size. Don't play around with this unless you know what you're doing, though - it's all too easy to trash your system.   Shrink and Expand size.  No more for a utility like the old Partition Magic
Open Command Prompt
Type Diskpart.exe /?

Switch to a projector
      Windows 7, 8 now provides a standard way to switch your display from one monitor to another or a projector - just press Win+P or run DisplaySwitch.exe and choose your preferred display. (This will have no effect if you've only one display connected.)

The 19 Best Windows Keyboard Shortcuts
     The Windows key now performs a wide variety of functions. Here are a handful of the most useful ones:
  • Win+h - Move current window to full screen
  • Win+i - Restore current full screen window to normal size or minimize current window if not full screen
  • Win+Shift+arrow - Move current window to alternate screen
  • Win+D - Minimize all windows and show the desktop
  • Win+E - Launch Explorer with Computer as the focus
  • Win+F - Launch a search window
  • Win+G - Cycle through gadgets
  • Win+L - Lock the desktop
  • Win+M - Minimize the current window
  • Win+R - Open the Run window
  • Win+T - Cycle through task bar opening Aero Peek for each running item
  • Win+U - Open the Ease of Use center
  • Win+Space - Aero Peek the desktop
  • Ctrl+Win+Tab - Open persistent task selection window, roll mouse over each icon to preview item and minimize others
  • Win+Pause/Break   Open system properties
  • Win+P Adjust Presentation Settings for Display
  • Win+ (+/-) Magnifier Zoom in (+) Zoom Out (-)
  • Win + TAB  use with AERO to cycle between windows
  • Alt+P Display/ hide the Explorer preview pane

Net Accounts, Net Accounts /Domain Command Details and Examples

You must access a command prompt and be logged on to an account with network administration permissions. Net accounts command allows administrators to control user account logon settings from command line. Below you can find the syntax of net accounts command explained with examples.
net accounts /domain


C:\>net accounts
Force user logoff how long after time expires?:       Never
Minimum password age (days):                          1
Maximum password age (days):                          42
Minimum password length:                              7
Length of password history maintained:                24
Lockout threshold:                                    Never
Lockout duration (minutes):                           30
Lockout observation window (minutes):                 30
Computer role:                                        WORKSTATION
The command completed successfully.

C:\>net accounts /domain
The request will be processed at a domain controller for domain      git.group.
Force user logoff how long after time expires?:       Never
Minimum password age (days):                          1
Maximum password age (days):                          42
Minimum password length:                              7
Length of password history maintained:                24
Lockout threshold:                                    Never
Lockout duration (minutes):                           30
Lockout observation window (minutes):                 30
Computer role:                                        BACKUP
The command completed successfully.

Details and Examples net user /domain user info from the command line

Use the command "net user accountname /domain" to display user information
Running that command gives you something like this: net user thinnawutp /domain (2 domain output sample)

net user

Net User
 
To obtain a list of domain users and groups you can query the domain controller as follows:
net user /domain > users.txt
net group /domain > groups.txt

How to logoff remote desktop via Terminal Server Commands "Query session | Reset session"

This is just a quick guide to check the error message "The terminal server has exceeded the maximum number of allowed connections" that you can use this command to figure out what sessions are connected to the server.

Use this command to display information about administrative and client node sessions: query session /server:yourcomputer
commnad check RDP

To reset the session of user1 by using the session name:
reset session rdp-tcp#1

To reset the session of user1 by using the session ID:
reset session 1

How to enable ping response in Windows Server with commandline

This is just a quick guide to enabling a server to respond to ping, the default setting in Windows Server is to disable. I would like to recommend this command "Netsh firewall set icmpsetting 8". While running this command, just wait since it takes a little time and this is the result:,
Netsh firewall set icmpsetting 8 disable

Once enabled you can also simply disable the ping utility also by repeating the same above steps the only difference would be the command name. Open the command prompt in Administrator mode as described earlier. You will have to type “Netsh firewall set icmpsetting 8 disable” in the command prompt.

How to find MAC address... either locally or across a network

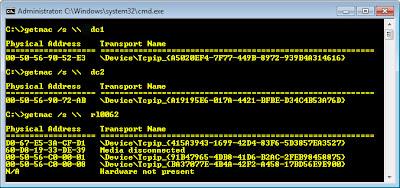
Getmac | I would like to recommend this parameter "getmac /s \\remotecomputer", it helps you can remote to other PCs easily. While running this command, just wait since it takes a little time and this is the result:,
getmac command

Returns the media access control (MAC) address and list of network protocols associated with each address for all network cards in each computer, either locally or across a network.
getmac
getmac /v


Note: export the output by using this command getmac /s \\remotecomputer >> c:\getmacresult.txt

Commands Every Administrator Should Know "Driverquery"

Driverquery = Displays a list of all installed device drivers and their properties. I would like to recommend this parameter "driverquery /s \\remotecomputer" , it helps you can remote to other PCs easily

Incorrect device drivers can lead to any number of system problems. If you want to see which drivers are installed on a Windows system, you can do so by running the driverquery tool. This simple command-line tool provides information about each driver that is being used. The command is:
driverquery
Driverquery

If you need a bit more information, you can append the -v switch. Another option is to append the -si switch, which causes the tool to display signature information for the drivers. Here’s how they look:

driverquery -v
driverquery -si
driverquery /nh

Note: Sample command with export the result... driverquery /s \\remotecomputer >> c:\driverresult.txt