Learn some helpful IT Administrator tips and tricks.

Welcome to the most comprehensive list of tips and tricks for IT field, you'll find anywhere on the internet. I hope these tips help you get the most out of your internet.

Cloud Computing Next Generation of your company

Benefits of cloud computing is increased efficiency; services are rapidly deployed and ready for use in your company. Find out about the benefits of moving your business to cloud computing....

Support Tips and Tricks

Tips and Tricks for. Learning Before. Helping. Learning. Service. Research Computing... We are ...

Server, Network, System, Application | Diagram

Client-side Examples; Server-side Examples; Client-side Advantages ... this concept is to view the following diagram and considering some examples: ...

Good roadmap for System Engineer, Network Engineer

Roadmap global customer support professionals are focused on crucial, quick issue resolution and uninterrupted service.. HOW?

Showing posts with label Servers. Show all posts

Friday, March 15, 2013

Enable Role Remote Desktop Web Access

This provides clients an interface to access their virtual desktop. Let's see how to set up Remote Desktop Services on Windows 2008 R2 by enabling Remote Desktop Web Access Role Service.

Use the following steps to install the RD Web Access role service:
  1. Log on to the desired server with local administrator privileges.
  2. Click Start, and then click Run.
  3. In the Run dialog box, type in ServerManager.msc and click OK.
  4. In the Roles Summary section, click the Add Roles task.
  5. After the Add Roles Wizard loads, click Next.
  6. On the Select Server Roles page, select the Remote Desktop Services role, and click Next.
  7. On the Remote Desktop Services page, click Next.
  8. On the Select Role Services page, only select the Remote Desktop Web Access role service. This is the only role service that is being installed at this time.
  9. When prompted with the Add Roles Wizard dialog box, click the Add Required Role Services button (any missing required role services or features for RD Web Access role service will now be added).
  10. On the Select Role Services page, click Next.
  11. On the Web Server (IIS) page, click Next.
  12. On the Select Role Services page, click Next (do not change the defaults).
  13. On the Confirm Installation Selections page, review the selections made, and then click Install.
  14. On the Installation Results page, review the results, and click Close
Connect to the RD Web Access Web site using either of the following methods:
  • On the RD Web Access server, click Start, Administrative Tools, Remote Desktop Services, Remote Desktop Web Access Configuration.
  • Using Internet Explorer, connect to the RD Web Access website using the following URL: https://<server_fqdn>/RDweb as shown in picture below
That is one way to do it, but if you want security in your terminal server implementation, you'd need to install a TS gateway somewhere (preferably on the edge of the network), and then have your clients connect through that so that CAPs and RAPs can be kept in check. The TS gateway service allows for RDP over HTTPS.

VLAN Numbering Standards Design Guide ~ Network, Server, IP phone, PCs

There are no hard and fast rules on how VLANs should be numbered on a campus network. However it is important to choose numbers that mean something and assist the network administrator. For example, vlans will be allocated for normal PC access, IP Telephony, servers and special cases such as inter-switch links.
We recommend that numbers are allocated to a meaningful scheme, such as
  • 100 – 199 allocated to PCs
  • 200 – 299 allocated to IP Telephony voice use
  • 300 – 399 allocated to servers
  • 400 – 499 allocated to security vlans
  • 900 – 999 allocated for special use
This worked design requires the following types of VLANs:
  • Server access VLANs – this is the VLANs which servers will use
  • Security VLANs – used where servers need to be put behind a firewall or IPS
  • Service VLANs – used to attach ILO/console ports or managed power strips to the network
  • “Special” VLANs – used for trunk native VLANs, and other uses that the designer may have. Not used for host attachment.
The previous diagram illustrates VLAN design diagram
This VLAN numbering scheme was implemented in the giant company datacenter design and will be used going forward in this document as a worked example.

VLAN# Description
100-199 Data Users
200-299 IP Phone user
300-399 Server VLANs
400-499 Server VLANs behind transparent firewall
500-599 Server VLANs behind IPS device
600-699 Service /  management Private VLANs (e.g. ILO/Envmon)
700-799 Spare
800-899 Spare
900-999 900 – used for trunk native VLAN, Others used for "system vlans" – e.g. dot1q L3 routed interfaces
1000-1099 Service /  management SVI VLANs (e.g. ILO)
Another approach could be to allocate a VLAN number based on where the access switch is located or the third octet in the IP address. This scheme was typically found in older network designs, and can be impractical if there are a lot of small subnets on the network as essentially it depends on every VLAN being a class C subnet.

The general rule of thumb is that the overall scheme should mean something and be a help rather than a burden to the network administrator.

If this network has to be integrated into an existing network where VLANs have been allocated in a haphazard manner, then it is recommended to follow the above scheme but use the 2000 to 2999 VLAN range (for example, Data Users would be on 2100-2199)

DHCP design guidance for Small Sites (Less than 300 Users)


This article explains the DHCP Server recommendations especially for Small Site (Less than 300 Users). This guidance can be applied to your system.
DHCP Server Configuration
A small site is described as a site with less than 300 users in their facility. Your Management team could the following recommendation design for DHCP. 
  • Option 1 - DHCP on the next uplink site
      In most cases, the scopes configured to cover the mobile sites would include lease times longer than the typical configuration of other DHCP scopes.  This will allow any clients in the remote site to keep their IP address leases active for a longer period of time in the event of poor network connectivity back to the DHCP server.  Any administrative access and management of the actual scopes would need to be addressed with the local site administrators where the NS server is located.
  • Option 2 - DHCP on a local Network Router
      - Network routers are capable of providing DHCP services. This recommends having the local scopes configured on the router.
      - The Network Team manages and creates the DHCP scopes, and any additional required scope\server options.
  • Option 3 - DHCP on a local File/Multifunction server
      The remote site will need to have a local server to host the DHCP scopes.  The local IT administrators would be responsible for IT Compliance of the server, and would need to abide by all rules and regulations put in place by the IT team.
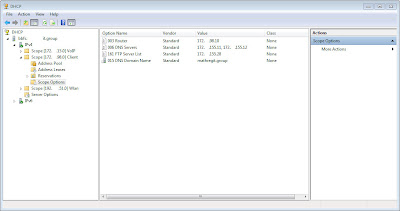
DHCP
For large sites (Greater than 300 users) Sites with more than 300 users are usually recommended to purchase and maintain a local NS server in their facility. You can follow recommendation designs for DHCP as
  • Option 1 - DHCP on a local NS Server  An NS Server is a server which hosts DNS, DHCP, and WINS only.  The dedicated NS box will provide the best performance for most sites with a larger user base.  This will allow for your site to still locally obtain a dynamic IP address, be able to perform administration of DHCP as you currently have rights to do, and provide local caching DNS service to your users, thus reducing the traffic generated by DNS to your local Domain Controller.
  • Option 2 - DHCP on the next uplink site  The recommendation would be to host the local DHCP scopes on the next upstream DHCP server, which in most cases would be the Ehub.
    Any administrative access and management of the actual scopes would need to be addressed with the local site administrators where the NS server is located.
DHCP Messages
DHCP Lease Renewal

DHCP Relay Agent

Saturday, September 22, 2012

SQL Server: Installing Microsoft SQL Server 2012 On Windows 2008R2 (SP1) System

SQL Server 2012
   This is a simple step-by-step guide to installing Microsoft's newest version of SQL Server with Reporting Services in stand-alone mode (the alternative is SharePoint Integrated, I'll deal with all the steps necessary to do that installation separately in a few days/weeks time).

   The first step is to install your Windows 2008R2 box and get it fully upgraded to the latest patch levels (SP1). Then you can run the setup.exe on the installation DVD;
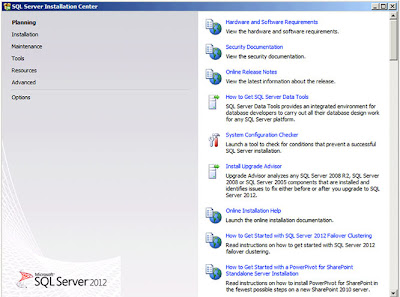
Installation Centre
SQL Server 2012: Installation Centre
Select "Installation" from the list of options on the left;
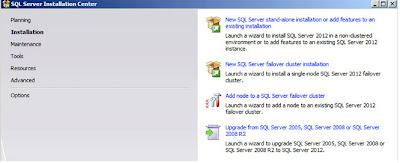
Installation Options
SQL Server 2012: Installation Options
Select "New SQL Server stand-alone installation ..." which is the top option on the right. After a few seconds wait (but I guess that probably depends on the speed and power of your system!) the following dialog appears;

Setup Support Rules
SQL Server 2012: Setup Support Rules
The installation program has checked your system and, on the system I'm using, found nothing that prevents the installation from proceeding. If you are interested in seeing the "Detailed Report". Once you've got a good set of passes click "OK". A "please wait" dialog will appear and after a few seconds the next dialog;
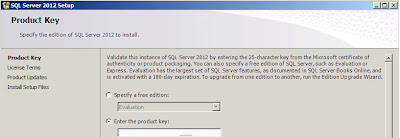
Product Key
SQL Server 2012: Product Key
You now need to enter your Product Key. If you are using the MSDN edition then it will be pre-populated, if you don't have one when you can just select one of the "Free" editions. Once you've entered the details click "Next";
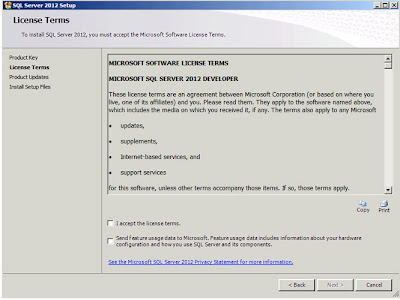
License Terms
SQL Server 2012: License Terms
No installation process would be complete without a 20-page Licensing Agreement and this one is no different. After you've read the entire document (you do do that right? *cough*) click on the "I accept the license terms". I also select the "Send feature usage data to Microsoft" and if you don't you'll only have yourself to blame when the features I use and tell them about are prioritised for improvement and the features you use but keep secret about aren't ... ;-) Click "Next";
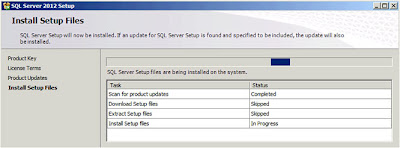
Install Setup Files
SQL Server: Install Setup Files
This dialog will only appear for a few seconds, as soon as the installation files have been successfully installed you are presented with the next dialog;
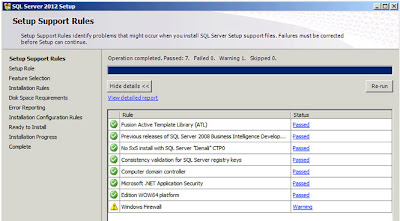
Setup Support Rules
SQL Server: Setup Support Rules
Again I've made the Detailed Report for this check available via Google Docs here. As you'll see there is one Warning related to the "Windows Firewall", I'm going to ignore this and just move on. Click "Next";
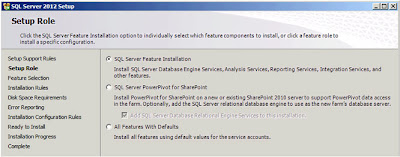
Setup Role
SQL Server: Setup Role
The default option, "SQL Server Feature Installation" is the one I'm after so I'll just click "Next";
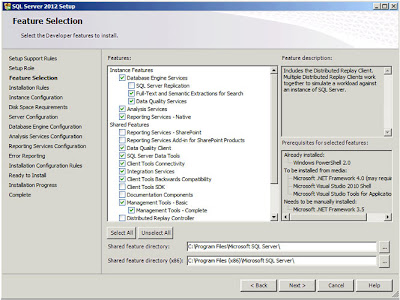
Feature Selection
SQL Server: Feature Selection
And this is the part where things start to get complicated. What exactly do you want your SQL Server to be doing? I'm going to install pretty much everything except the SharePoint integrated features (the first two shared features; Reporting Services - SharePoint, and Reporting Services Add-in for SharePoint Products). Click "Next";
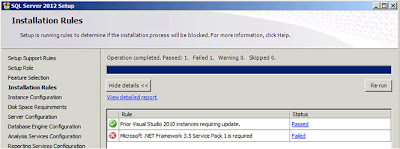
Installation Rules
SQL Server: Installation Rules
So we now have another check, the third, to make sure the system is capable of running the options I've selected. And now it "Failed" as "Microsoft .NET Framework 3.5 Service Pack 1 is required". The instructions for enabling this feature I have also blogged about, click here. When I did this no-reboot was required. After you've enabled the feature click on "Re-run" in the dialog;
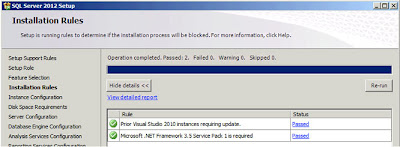
Installation Rules (Attempt 2)
SQL Server: Installation Rules (Attempt 2)
As you can see the check that had previously failed has now passed. The Detailed log is available (via Google Docs) here. Click "Next";
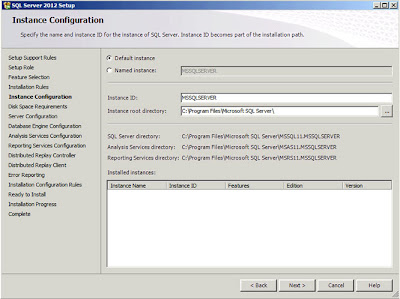
Instance Configuration
SQL Server: Instance Configuration
There isn't anything here I need to change so just click "Next". There will be a brief pause while the installation program checks to see if sufficient disk space exists to install the options you have selected. After a few seconds a report will be displayed;

Disk Space Requirements
SQL Server: Disk Space Requirements
Click "Next";

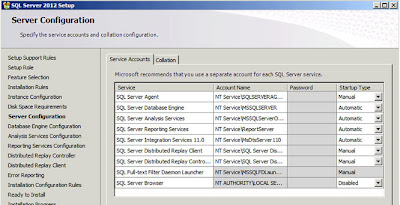
Server Configuration
SQL Server: Server Configuration
It's pretty unlikely that you'll want to change anything here (all these are services you can always change later). The one thing you might want to check if you are deploying to non-English customers is that the correct options are selected under the "Collation" tab - this is especially true if your system will be used to store multi-byte data such as Chinese, Japanese, Korean, etc. characters. Click "Next" when you're done;
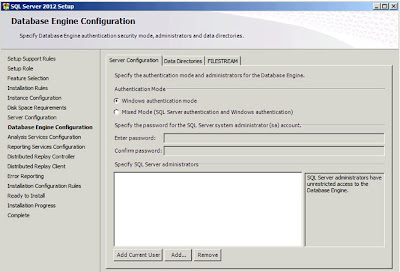
Database Engine Configuration
SQL Server: Database Engine Configuration
I always use "Windows authentication". I usually add in a few AD groups representing the entire company (we are an IT Service company) on the basis that I never know who I might want to share it with. This is your chance to secure the system either as tightly or loosely as you wish. Click "Next";
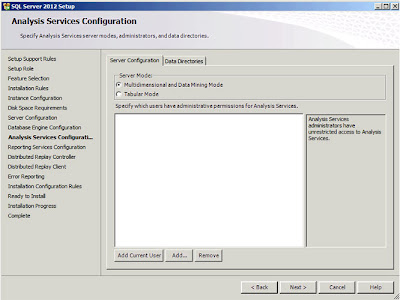
Analysis Services Configuration
SQL Server: Analysis Services Configuration
And the same again really. You need to enter the users who will have access to the Analysis Services. Once you're happy with this click "Next";
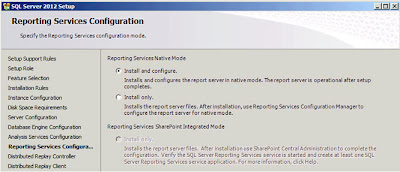
Reporting Services Configuration
SQL Server: Reporting Services Configuration
The default option, "Install and Configure", is the option I'm interested in so just click "Next";

Distributed Replay Controller
SQL Server: Distributed Replay Controller
Whilst appearing to be exactly the same as other "Pick the users" dialog box this one is subtly (invisibly!) different; you cannot select groups. If you try when you click "Next" you get an error;
The specified account 'XX\YYYY' for setting 'CTLRUSERS' is a group account. You can only use a user account. Add in the users for this feature and click "Next";

Distributed Replay Chat
SQL Server: Distributed Replay Chat
Enter the name of your controller (or leave blank) and then click "Next";
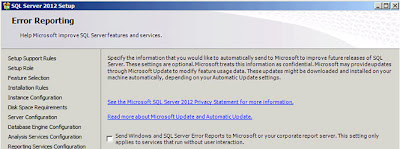
Error Reporting
SQL Server: Error Reporting
 I always check this check box (to send error reports to Microsoft) so that errors I encountered will hopefully be dealt with in future releases! Click "Next" when you're done and another round of checks will be executed and after a few seconds you will be presented with a report;


Installation Configuration Rules
SQL Server: Installation Configuration Rules
Click "Next";

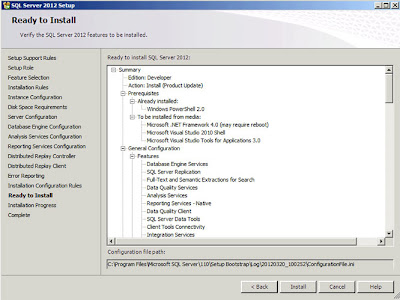
Ready To Install
SQL Server: Ready To Install
Click "Install" to begin the install process. The installation itself on the development system I was using took around 25/30 minutes. After the install is complete you will see the following dialog;

Computer Restart Required
SQL Server: Computer Restart Required
 Click "OK" and under this is the final installation report;
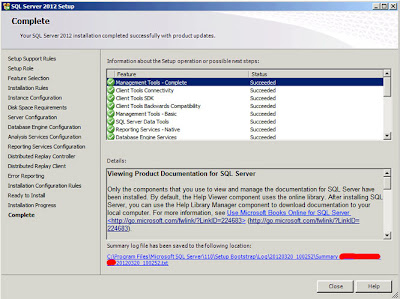
Complete (Install Report)
SQL Server: Complete (Install Report)

A restart is required, after the restart running Internet Explorer and pointing to the the SQL Server Reporting Services URL will (after logging in) take you to the standard webpage.

Windows 2008R2: Installing .NET Framework (Enabling the Feature)

Installing .NET Framework
     2008R2 includes the .NET Framework as a feature that needs to be turned on when required. Numerous installation programs (for example SQL Server 2012) require it and will mostly just error and tell you to turn the feature on.

     The blog post is intended as a step-by-step guide to switching the feature on.

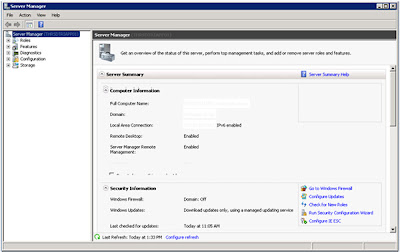
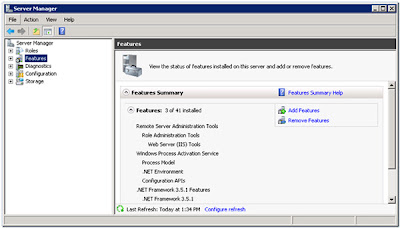
     Go to the start menu and type "Feature" into the search box, choose the option "Turn Windows Features on or off". The Server Manager will then be displayed;


2008R2: Server Manager
Windows 2008r2: Features
    Click on "Features" in the tree-view on the left;

Windows 2008r2: Select Features Dialog
     If you already have any features installed they will be listed here. Click on "Add Features" on the right;     Expand the top node in the list (.NEW Framework 3.5.1 Features) and select the first item ".NET Framework 3.5.1). Click "Next";


2008R2: Select Features Dialog
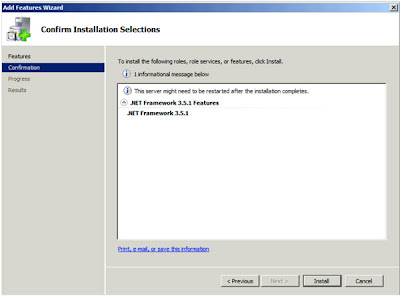
Windows 2008r2: Confirm Installation Selections
    Expand the top node in the list (.NEW Framework 3.5.1 Features) and select the first item ".NET Framework 3.5.1). Click "Next";

2008R2: Confirm Installation Selections
Windows 2008r2: Confirm Installation Selections
    Click "Install", the next dialog actually shows the installation process which should take about 30 seconds (depending on how powerful your system is!) then you will see the following;

2008R2: Installation Results
Windows 2008r2: Installation Results
    Presuming you have "Installation succeeded" in the dialog click on "Close" to complete the process.

Wednesday, July 18, 2012

How to use GPO to remotely install software in Windows Server 2008

       You can use Group Policy to assign or to publish software to users or computers in a domain. Additionally, it is useful to be able to deploy software based on group membership. A Group Policy object (GPO) is usually applied only to members of an organizational unit (OU) to which the GPO is linked.

Create a Distribution Point
       To publish or assign a computer program, you must create a distribution point on the publishing server:
  1. Log on to the server computer as an administrator.
  2. Create a shared network folder where you will put the Microsoft Windows Installer package (.msi file) that you want to distribute.
  3. Set permissions on the share to allow access to the distribution package.
  4. Copy or install the package to the distribution point. For example, to distribute Microsoft Office XP, run the administrative installation (setup.exe /a) to copy the files to the distribution point.
Assign a Package
       To assign a program to computers that are running Windows Server 2003, Windows 2000, or Microsoft Windows XP Professional, or to users who are logging on to one of these workstations:
  1. Start the Active Directory Users and Computers snap-in. To do this, click Start, point to Administrative Tools, and then click Active Directory Users and Computers.
  2. In the console tree, right-click your domain, and then click Properties.
  3. Click the Group Policy tab, select the group policy object that you want, and then click Edit.
  4. Under Computer Configuration, expand Software Settings.
  5. Right-click Software installation, point to New, and then click Package.
  6. In the Open dialog box, type the full Universal Naming Convention (UNC) path of the shared installer package that you want. For example, \\file server\share\file name.msi.

    Important Do not use the Browse button to access the location. Make sure that you use the UNC path to the shared installer package.
  7. Click Open.
  8. Click Assigned, and then click OK. The package is listed in the right pane of the Group Policy window.
  9. Close the Group Policy snap-in, click OK, and then quit the Active Directory Users and Computers snap-in.
  10. When the client computer starts, the managed software package is automatically installed.

Publish a Package
       To publish a package to computer users and make it available for installation from the Add or Remove Programs tool in Control Panel:
  1. Start the Active Directory Users and Computers snap-in. To do this, click Start, point to Administrative Tools, and then click Active Directory Users and Computers.
  2. In the console tree, right-click your domain, and then click Properties.
  3. Click the Group Policy tab, click the group policy object that you want, and then click Edit.
  4. Under User Configuration, expand Software Settings.
  5. Right-click Software installation, point to New, and then click Package.
  6. In the Open dialog box, type the full UNC path of the shared installer package that you want. For example, \\file server\share\file name.msi.
    Important Do not use the Browse button to access the location. Make sure that you use the UNC path to the shared installer package.
  7. Click Open.
  8. Click Publish, and then click OK.
  9. The package is listed in the right pane of the Group Policy window.
  10. Close the Group Policy snap-in, click OK, and then quit the Active Directory Users and Computers snap-in.
  11. Test the package:
Note Because there are several versions of Microsoft Windows, the following steps may be different on your computer. If they are, see your product documentation to complete these steps.
         a. Log on to a workstation that is running Windows Vista or Windows 7 by using an account that you published the package to.
         b.In Windows 7, click Start, and then click Control Panel.
         c.Double-click Program and Feature, and then click Add New Programs.
         d.In the Add programs from your network list, click the program that you published, and then click Add. The program is installed.
         e.Click OK, and then click Close.

Note if you upgrade or modify the package, you can redeploy a software package

force proxy setting via group policy(GPO)

       We are using GPOs to apply proxy settings in our domain. Works fine and gives us the flexibility we need. GPOs are applied at system startup or user login. Take a look into the refresh policy. Changed GPOs will not be applied before the refresh interval takes place (in case the user remains logged in).

This article describes how to force proxy setting via group policy.
  • Click StartAll programs – Administrative Tools – Group Policy Management.
  • Create or Edit Group Policy Objects.
  • Expand User configurationPoliciesWindows SettingsInternet Explorer MaintenanceConnection.
  • In right Pane Proxy Settings.

For some security reasons maybe administrator need to prevent end users from change their proxy settings. You can do it with group policy follow this steps:
  • Click StartAll programs – Administrative Tools – Group Policy Management.
  • Create or Edit Group Policy Objects.
  • Expand Computer Configuration – Administrative Templates – Windows Components - Internet Explorer – Internet Control Panel
  • In right Pane Disable the Connections page (Enabled)
       Removes the Connections tab from the interface in the Internet Options dialog box. If you enable this policy, users are prevented from seeing and changing connection and proxy settings. If you disable this policy or do not configure it, users can see and change these settings. When you set this policy, you do not need to set the following policies for the Connections tab, because this policy removes the Connections tab from the interface
Use GPORESULT (resource kit) to check if a GPO will be applied or not.

More info...

Friday, June 1, 2012

How to find who is accessing shared folder/files on network

       Windows allows us to easily share files and folders with other people on our network but some of us may want to know when someone else is accessing our shared files and folders. I am going to show everyone for How to find who is accessing shared folder/files on the network.

Computer Management
Computer Management Windows
      For all its faults, Windows has a lot of features. In fact, many people outside the tech circle don't even know most of them. Computer Management is one of these features. From Computer Management, users can do many things. Amongst these "many things", users have the ability to

  1. See all the folders they are sharing (Computer Management -> System Tools -> Shared Folders -> Shares);
  2. See who (from their network) is connected to their computer (Computer Management -> System Tools -> Shared Folders -> Sessions);
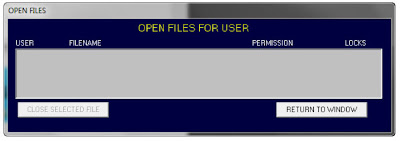
  3. What shared files are opened (Computer Management -> System Tools -> Shared Folders -> Open Files).
        You also have the ability to create new shares, stop sharing specific shares, disconnect anyone connected to your computer, or disconnect access to just the opened files. If you want can also right click on "Computer Management (Local)" -> "Connect to another computer" to monitor the shares of another computer (if you have access).

      To access Computer Management, simply find it under Control Panel, or open Start Menu -> Run and type in compmgmt.msc (Windows Vista and Win7 users can just type compmgmt.msc in their search box instead of going to Run).

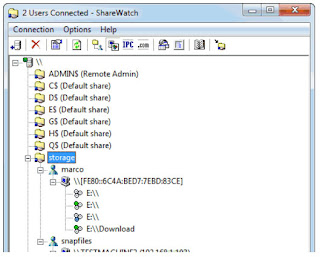
ShareWatch
ShareWatch Windows
       ShareWatch is a very small (77 KB) free, portable, and standalone application which monitors all shared folders and files on your computer. Like Computer Management, it allows you to disconnect a user's access to your computer or to a file at will. While you can't add new shares with ShareWatch, you can stop sharing a share. Like Computer Management, ShareWatch allows you to monitor the shares of a remote server or computer (if you have permission/access to do that).
      ShareWatch only watches folders that are shared out using the Windows folder sharing feature.  This is usually how people share files and printers with each other on a home or corporate network.  It can watch the shares of local and remote Windows computers, assuming you have the correct permissions to watch shares on a computer.  ShareWatch will show you the users connected and what files are in use by each user.  It will also let you close files, disconnect users, and remove shares.

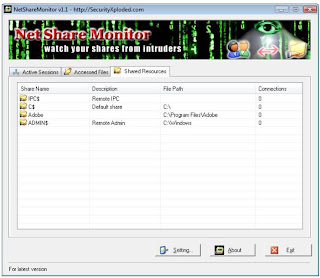
Net Share Monitor
Net Share Monitor Windows
       Net Share Monitor is another small (636 KB), free, portable, and standalone application which monitors local or remote shares. It tells you who is connected and what files are being access. Just like ShareMonitor and Computer Management, you have the ability to disconnect users or access to files. Two features unique to Net Share Monitor, however, is the ability to log all activity related to shares and play a sound to notify the user a new connection has been opened to the shares. Features lacking in Net Share Monitor include not being able to create a new share or stop sharing a share.
       Now you no longer have to worry about your shared files being accessed by unknown persons on the network. You can make NetShareMonitor to keep eye on your shares while you get down to work. It will alert you on any file access and you can always check the log files for past sessions in case you have missed the alert.


System Tray Share Monitor
System Tray Share Monitor Windows

       System Tray Share Monitor, while not that small in size, portable, or standalone, is an open source software which pretty much does the same thing as Net Share Monitor: it tells you who is connected and what files are being access, you have the ability to disconnect users or access to files, and you can log all shares related activity. One feature in System Tray Share Monitor not present in all the others is the ability to filter what shares/files you monitor by connected user's username, computer network name/IP, number of files opened, or max idle time.

       Overall which one of the above methods you want to use will depend on your needs. If you want to just occasionally monitor shares, there is no need to download a third party program when Computer Management will do that for you. However if you want to monitor shares on a regular basis, Net Share Monitor is the way to go because not only will it notify you when users connect, but it can also log the activity. Plus Net Share Monitor is portable and standalone, so you don't need to install it and you can take it with you on the go.

Monday, April 16, 2012

Network Recovery Strategy ~ BCP

       This is to show example for Network Recovery Strategy ~ BCP for network part that can be applied to your business. The network and operations facilities at data center provide business application systems for your business and include:
  • Core Network Services: (Exchange Email, File and Print Services, Internet / Intranet)
  • Business Applications: (ERP, Financials, A/R, A/P, AM, billing), Mainframe printing.
  • User Workstations and associated application software for approximately 150 users in Marketing, Finance, Staff / IT etc.
Disaster Classification:
  • Level 1Temporary (less than 7 days)  Loss of power / water to your building.  This would require the shutdown of the computer room and servers but loss of equipment or data would be minimal.
  • Level 2Significant (greater than 7 days) – building cannot be occupied (fire/water damage, disease, other threat) but city infrastructure is intact.
  • Level 3Significant widespread damage to the city infrastructure (earthquake). Many core services are unavailable; employees are unable to report to work etc.
The IT recovery strategy is primarily designed to respond to level 1 or level 2 disasters.  Level 3 disasters are within the scope of your business resumption plan where the primary focus is on ensuring the safety and security of employees and company assets and providing disaster assistance to the community.

Key Assumptions Example:
  • The primary recovery site for your site is the …
  • The backup site facilities have the minimum network and hardware components required to establish basic network operations.  The alternate site emergency response facility and equipment (laptops/printers) are available for use.
  • A portion of the backup office facilities and equipment (workstations / printers) are available for your users.
  • The recovery of business application systems (ERP etc.) would require sourcing appropriate hardware (via hardware vendor)
  • All recovery documentation and required backup tapes are available offsite.
  • Current IT staff is available to perform recovery processes.  Additional resources are available from other your company locations.
Recovery Phases:
Phase 0  Day 1
     Disaster
     Ensure safety of employees
     Notification / communication / Formal Disaster Declaration
     Assembly of recovery team / roles
     Assessment of Impact, stability of recovery facility, and recovery timeframe
     Determine Recovery Strategy
     Order recovery tapes
Phase 1 Day 2-4
     Recover Core Network Components:
        • Exchange Server
        • File Servers
        • WAN connectivity
Phase 2 Day 5 - 10
     Recovery Core Business Applications
     ERP
     Mainframe Printing

Phase 3 Day 10 - 30
Complete Recovery of All Systems or reactivation of data center

Notification and Declaration of a Disaster
       The first and foremost objective when a disaster happens is to ensure the safety of all staff and takes precedence over any recovery activities.
       During a recovery process, recovery personnel must take appropriate and adequate rest breaks and use safety controls to ensure their personal safety.  The maximum length of a recovery shift is 12 hours and includes periodic rest breaks.

       The primary responsibility for declaring an IT/Network disaster and invoking the disaster recovery plan rests with the Manager of Information Technology.   Secondary responsibility rests with the Network Team Lead and Office and Information Services Team Leads in consultation with your company Leadership Team.  Specific responsibilities are:
  • Communicate disaster to your company Leadership team – what happened, why, when, initial assessment and recovery overview.
  • Identify and contact the IT recovery teams, recovery team leads as well as a recovery coordinator.  The recovery teams will be created from the existing IT organization based on who is available.  For a disaster requiring recovery to an alternate site, or where the recovery time is likely to exceed 12 hours at least 2 teams should be created. 
  • Facilitate the assessment of the disaster and development of a recovery plan.
  • Ongoing communication to your company Leadership team, management and employees as appropriate.  

Sunday, April 15, 2012

GUIDELINES FOR SITES WITH < 512K AVAILABLE DATA-ONLY TO DC PROMO

      I would like to share the GUIDELINES FOR SITES WITH 512K AVAILABLE DATA-ONLY CONNECTIONS and PROPOSE TO DC PROMO THIER LOCAL DCs. For sites which plan to install and promote (locally) an AD domain controller, a 512K available Data-only connection is the strong recommendation. And the only connection I am quite confident will succeed and not require additional support and effort.   If the site has a link lower than that, additional research needs to be done to ensure a smooth promotion and to minimize adverse business impact.

      My recommendation that we feel comfortable with. is 512K data only.  Anything under that, we may be able to try, but unfortunately, we cannot guarantee anything.  So it is up to the site to determine if they want to take on that risk.  For example, if a site’s circuit is going to be upgraded later anyway, they may want to wait.  Unless there's a business case that indicates a site cannot wait.
Considerations:
       Those at the site representing the business must understand and agree to the additional risk, should they elect to promote a DC over a <512K available data-only  link, which includes:
  • Very very slow connections to external resources, including applications, internet, etc. for a week or more.  They should expect 3 weeks.
  • A successful promotion at a similar site does not ensure other similar sites will be successful.  Because every site is different, and the databases increase daily.
Here are the rules:
       If a site MUST DC Promo over a smaller (than 512 available -  meaning part of the link isn’t dedicated to some other data stream like Mail, ERP, etc.-   data-only) or shared link,  the Server Infrastructure Team needs to talk to them to gather important information.
  • It is critical that the design teams understand what is going over the connection, so we can make an informed decision.
  • When promotions fail, it causes rework and could delay other sites.   Also, the rework always introduces some small amount of risk that something inadvertently corrupts the rest of the forest. 
  • Once we all understand what is going over the <512K link, the customer agrees to the risk, and the Server Infrastructure Team design team feels it will not adversely impact others, we can OK the attempt at a DC promotion.  Again, the site will be expected to significantly reduce any other traffic going over the link during the promotion, and also during the SMS build. Traffic what should be taken into consideration, and significantly curtailed includes:
          • voice traffic
          • external application traffic (like intranet, ERP)
          • Internet traffic
          • Promotions must start the Fri just before a weekend to ensure the best throughput.
          • Promote the DC at a well-connected site, and then ship to the other site whenever possible.
  • We can't make a lot of special allowances trying to make it work, If it promotes, it promotes.  And if it doesn't, it doesn't.  In many cases, we can try it, if the customers willing to take on the risk. And once all servers come up on site, we cannot be certain there will be no performance degradation when servers try to sync etc….  Again, there are too many variables. 
      We need to address and agree to the plan for <512K available data-only sites well in advance of their planned DC promotions.  That way, things can run as smoothly as possible.

Application Service Provider Checklist Examples

       The purpose of "Application Service Provider Checklist" is to obtain background information for those external vendors (3rd parties) that are currently providing or plan to provide external application hosting services for your business.
Items Service Provider Response
A1 Provide the name of the Application Service Provider (Outsourcer) and business address.
A2 Provide the name of the application to be hosted at the provider’s location.
A3 How long have you performed as or provided Application Service Provider (ASP) hosting services?
A4 How many applications do you provide hosting services for?
A5 How many customers do you currently support?
How many customers do you support for the application your company is interested in (if you host more than one application)?
A6 Do you provide both shared and dedicated infrastructure (application, database, O/S) hosting options?
a. How many customers utilize your shared infrastructure?
b. How many customers utilize your dedicated infrastructure?
c. Do you have separate database instances for your customers or do they share the same database?
d. Is the application, web, and database on separate servers?
e. How many application servers are used to host the application?
f. How many database servers are used to host the database?
g. For web-based environments, is the web server installed on the same server as the application? If no, how many web servers are used to support the application?
A7 What IT governance or security framework do you use for your control environment (COBIT, ISO17799, ISO 27002 internal policies and standards, etc.)?
A8 Do you have an internal and/or external audit function?
A9 Have you contracted with a 3rd party to provide an attestation of your control environment (i.e. SAS70 certified, BITS)?
a. Please indicate the name and how often performed
b. Note: for SAS70 please indicate - Type I, II
A10 Has or will a major acquisition (merger) occur in the next 6-12 months?
A11 What is your core business (expertise)?
Items Network Response
B1 Describe all end to end encryption methods currently supported (i.e.  SSL, HTTPS, VPN, IPSEC, SFTP) to securely transport data between you and your customers – include strength of cipher (i.e. 128 bit)?
B2 Describe all email encryption methods you currently support (i.e. TLS, PGP, etc.).
B3 Are strong authentication measures (i.e. two-factor authentication using RSA tokens or smartcards) used for remote access to your network or for remote administration of network devices (i.e. firewalls, routers, switches, IDS, etc)
Note: userid/password is single factor
B4 Is redundancy and/or failover employed for critical devices such as firewalls, servers, load balancers, etc.?  Please provide detail.
B5 Are intrusion detection or intrusion prevention systems used?
a. Network Based – where deployed
b. Host Based – where deployed
c. Application based – where deployed
B6 Please provide information about vulnerabilities assessments performed for your environment:
a. List the type of assessments performed (penetration tests, network vulnerability scanning, etc.)
b. Describe the scope of the assessments ( network perimeter, application assessment, etc.)
c. How often are they performed?
d. Are they performed by internal staff or external parties?
Items Operations   Response
C1 Where is the primary processing facility (data center) located?
C2 Are any functions outsourced to a 3rd party (i.e. application development, system or network admin, data center)?  Please describe.
C3 Is access to the datacenter where the IT infrastructure resides controlled by you or by a 3rd party?
C4 Describe your process for keeping abreast of security threats for network devices, database, and operating system components?
C5 Do you have procedures in place for incident response, escalation and investigation?
C6 Is a formal change control process used to manage and track customer change requests and changes to the application, database, network and operating system components?
C7 Are security threats (events) for the application, database and operating system logged and reviewed regularly?  How often?
C8 Do you have separate development, test and production environments?
C9 Does the application reside in the same domain as the applications used to support your business?
Does the application and its components reside on a separate VLAN from other applications?
C10 Is user access to the application controlled by the customer or the Application Service Provider (i.e. add/remove users, password management, assign roles, etc.)?
Items Disaster Recovery Response
D1 Do you have a documented Business Continuity and Disaster Recovery Plan to address short term and long term disruptions of service?
D2 Are the plans reviewed and tested at least annually?
D3 Describe customer involvement in the annual testing.
D4 Where is your alternate processing facility located?
D5 Is the alternate processing facility a hot-site or cold-site?  If other please explain.
D6 What type natural disasters are common in the region where the primary data center is located?