Learn some helpful IT Administrator tips and tricks.

Welcome to the most comprehensive list of tips and tricks for IT field, you'll find anywhere on the internet. I hope these tips help you get the most out of your internet.

Cloud Computing Next Generation of your company

Benefits of cloud computing is increased efficiency; services are rapidly deployed and ready for use in your company. Find out about the benefits of moving your business to cloud computing....

Support Tips and Tricks

Tips and Tricks for. Learning Before. Helping. Learning. Service. Research Computing... We are ...

Server, Network, System, Application | Diagram

Client-side Examples; Server-side Examples; Client-side Advantages ... this concept is to view the following diagram and considering some examples: ...

Good roadmap for System Engineer, Network Engineer

Roadmap global customer support professionals are focused on crucial, quick issue resolution and uninterrupted service.. HOW?

Wednesday, July 18, 2012

How to use GPO to remotely install software in Windows Server 2008

       You can use Group Policy to assign or to publish software to users or computers in a domain. Additionally, it is useful to be able to deploy software based on group membership. A Group Policy object (GPO) is usually applied only to members of an organizational unit (OU) to which the GPO is linked.

Create a Distribution Point
       To publish or assign a computer program, you must create a distribution point on the publishing server:
  1. Log on to the server computer as an administrator.
  2. Create a shared network folder where you will put the Microsoft Windows Installer package (.msi file) that you want to distribute.
  3. Set permissions on the share to allow access to the distribution package.
  4. Copy or install the package to the distribution point. For example, to distribute Microsoft Office XP, run the administrative installation (setup.exe /a) to copy the files to the distribution point.
Assign a Package
       To assign a program to computers that are running Windows Server 2003, Windows 2000, or Microsoft Windows XP Professional, or to users who are logging on to one of these workstations:
  1. Start the Active Directory Users and Computers snap-in. To do this, click Start, point to Administrative Tools, and then click Active Directory Users and Computers.
  2. In the console tree, right-click your domain, and then click Properties.
  3. Click the Group Policy tab, select the group policy object that you want, and then click Edit.
  4. Under Computer Configuration, expand Software Settings.
  5. Right-click Software installation, point to New, and then click Package.
  6. In the Open dialog box, type the full Universal Naming Convention (UNC) path of the shared installer package that you want. For example, \\file server\share\file name.msi.

    Important Do not use the Browse button to access the location. Make sure that you use the UNC path to the shared installer package.
  7. Click Open.
  8. Click Assigned, and then click OK. The package is listed in the right pane of the Group Policy window.
  9. Close the Group Policy snap-in, click OK, and then quit the Active Directory Users and Computers snap-in.
  10. When the client computer starts, the managed software package is automatically installed.

Publish a Package
       To publish a package to computer users and make it available for installation from the Add or Remove Programs tool in Control Panel:
  1. Start the Active Directory Users and Computers snap-in. To do this, click Start, point to Administrative Tools, and then click Active Directory Users and Computers.
  2. In the console tree, right-click your domain, and then click Properties.
  3. Click the Group Policy tab, click the group policy object that you want, and then click Edit.
  4. Under User Configuration, expand Software Settings.
  5. Right-click Software installation, point to New, and then click Package.
  6. In the Open dialog box, type the full UNC path of the shared installer package that you want. For example, \\file server\share\file name.msi.
    Important Do not use the Browse button to access the location. Make sure that you use the UNC path to the shared installer package.
  7. Click Open.
  8. Click Publish, and then click OK.
  9. The package is listed in the right pane of the Group Policy window.
  10. Close the Group Policy snap-in, click OK, and then quit the Active Directory Users and Computers snap-in.
  11. Test the package:
Note Because there are several versions of Microsoft Windows, the following steps may be different on your computer. If they are, see your product documentation to complete these steps.
         a. Log on to a workstation that is running Windows Vista or Windows 7 by using an account that you published the package to.
         b.In Windows 7, click Start, and then click Control Panel.
         c.Double-click Program and Feature, and then click Add New Programs.
         d.In the Add programs from your network list, click the program that you published, and then click Add. The program is installed.
         e.Click OK, and then click Close.

Note if you upgrade or modify the package, you can redeploy a software package

force proxy setting via group policy(GPO)

       We are using GPOs to apply proxy settings in our domain. Works fine and gives us the flexibility we need. GPOs are applied at system startup or user login. Take a look into the refresh policy. Changed GPOs will not be applied before the refresh interval takes place (in case the user remains logged in).

This article describes how to force proxy setting via group policy.
  • Click StartAll programs – Administrative Tools – Group Policy Management.
  • Create or Edit Group Policy Objects.
  • Expand User configurationPoliciesWindows SettingsInternet Explorer MaintenanceConnection.
  • In right Pane Proxy Settings.

For some security reasons maybe administrator need to prevent end users from change their proxy settings. You can do it with group policy follow this steps:
  • Click StartAll programs – Administrative Tools – Group Policy Management.
  • Create or Edit Group Policy Objects.
  • Expand Computer Configuration – Administrative Templates – Windows Components - Internet Explorer – Internet Control Panel
  • In right Pane Disable the Connections page (Enabled)
       Removes the Connections tab from the interface in the Internet Options dialog box. If you enable this policy, users are prevented from seeing and changing connection and proxy settings. If you disable this policy or do not configure it, users can see and change these settings. When you set this policy, you do not need to set the following policies for the Connections tab, because this policy removes the Connections tab from the interface
Use GPORESULT (resource kit) to check if a GPO will be applied or not.

More info...

How to Disable USB Storage Devices ports in Windows 7

      USB storage devices are so common these days almost everyone owns USB storage device in shape of small flash drives, external hard disks, mobile phones, cameras, and lots of other portable devices. So if you want to secure your computer from stealing data, viruses or any other risks then simply disable the USB ports for USB storage devices / disk drives. To block the USB storage devices just follow the given steps below.

Note: this method just block the USB drives (Flash drives, External HDD, Mobile Phones, etc.) not the USB mouse, Keyboard, etc.


How to Disable USB ports
Press Windows + R from keyboard, type “regedit” in the “Run” window and hit Enter.

Explore the registry editor folders
 HKEY_LOCAL_MACHINE\SYSTEM\CurrentControlSet\Services\USBSTOR
in the right pane double click to open “Start” DWORD value as shown below.

Change its value to 4 and click “OK” button to save changes. Close the registry editor and plug in any USB storage device to check.

Friday, June 1, 2012

How to find who is accessing shared folder/files on network

       Windows allows us to easily share files and folders with other people on our network but some of us may want to know when someone else is accessing our shared files and folders. I am going to show everyone for How to find who is accessing shared folder/files on the network.

Computer Management
Computer Management Windows
      For all its faults, Windows has a lot of features. In fact, many people outside the tech circle don't even know most of them. Computer Management is one of these features. From Computer Management, users can do many things. Amongst these "many things", users have the ability to

  1. See all the folders they are sharing (Computer Management -> System Tools -> Shared Folders -> Shares);
  2. See who (from their network) is connected to their computer (Computer Management -> System Tools -> Shared Folders -> Sessions);
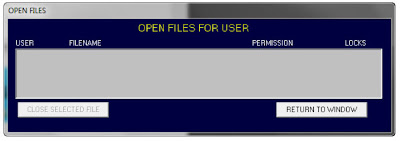
  3. What shared files are opened (Computer Management -> System Tools -> Shared Folders -> Open Files).
        You also have the ability to create new shares, stop sharing specific shares, disconnect anyone connected to your computer, or disconnect access to just the opened files. If you want can also right click on "Computer Management (Local)" -> "Connect to another computer" to monitor the shares of another computer (if you have access).

      To access Computer Management, simply find it under Control Panel, or open Start Menu -> Run and type in compmgmt.msc (Windows Vista and Win7 users can just type compmgmt.msc in their search box instead of going to Run).

ShareWatch
ShareWatch Windows
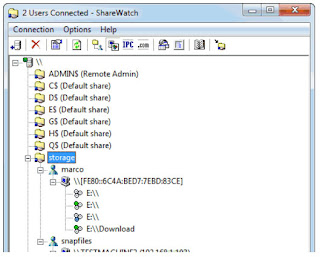
       ShareWatch is a very small (77 KB) free, portable, and standalone application which monitors all shared folders and files on your computer. Like Computer Management, it allows you to disconnect a user's access to your computer or to a file at will. While you can't add new shares with ShareWatch, you can stop sharing a share. Like Computer Management, ShareWatch allows you to monitor the shares of a remote server or computer (if you have permission/access to do that).
      ShareWatch only watches folders that are shared out using the Windows folder sharing feature.  This is usually how people share files and printers with each other on a home or corporate network.  It can watch the shares of local and remote Windows computers, assuming you have the correct permissions to watch shares on a computer.  ShareWatch will show you the users connected and what files are in use by each user.  It will also let you close files, disconnect users, and remove shares.

Net Share Monitor
Net Share Monitor Windows
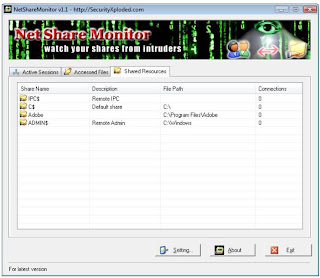
       Net Share Monitor is another small (636 KB), free, portable, and standalone application which monitors local or remote shares. It tells you who is connected and what files are being access. Just like ShareMonitor and Computer Management, you have the ability to disconnect users or access to files. Two features unique to Net Share Monitor, however, is the ability to log all activity related to shares and play a sound to notify the user a new connection has been opened to the shares. Features lacking in Net Share Monitor include not being able to create a new share or stop sharing a share.
       Now you no longer have to worry about your shared files being accessed by unknown persons on the network. You can make NetShareMonitor to keep eye on your shares while you get down to work. It will alert you on any file access and you can always check the log files for past sessions in case you have missed the alert.


System Tray Share Monitor
System Tray Share Monitor Windows

       System Tray Share Monitor, while not that small in size, portable, or standalone, is an open source software which pretty much does the same thing as Net Share Monitor: it tells you who is connected and what files are being access, you have the ability to disconnect users or access to files, and you can log all shares related activity. One feature in System Tray Share Monitor not present in all the others is the ability to filter what shares/files you monitor by connected user's username, computer network name/IP, number of files opened, or max idle time.

       Overall which one of the above methods you want to use will depend on your needs. If you want to just occasionally monitor shares, there is no need to download a third party program when Computer Management will do that for you. However if you want to monitor shares on a regular basis, Net Share Monitor is the way to go because not only will it notify you when users connect, but it can also log the activity. Plus Net Share Monitor is portable and standalone, so you don't need to install it and you can take it with you on the go.

Friday, May 25, 2012

Windows Server 8 will be named Windows Server 2012

Windows Server 8
      Microsoft officials said during the opening keynote of the Microsoft Management Summit (MMS) 2012 in Las Vegas that the final name of Windows Server 8 will be “Windows Server 2012.”

      Windows Server 2012 will include Microsoft's new Resilient File System (ReFS) to handle large volumes, resiliency to corruption, and shared storage pools across machines. ReFS will only be available inside Windows Server 2012 initially, but Microsoft has plans to test it within the server edition and make it available to Windows 8 client users at a later date. Microsoft has also previously promised that the majority of applications that currently run on Windows Server 2008 and R2 "should work" on Windows Server 2012.


      Microsoft's naming strategy for Windows Server 2012 and its indication of a release later this year all but confirms that Windows 8 will be available before the end of 2012. The company has a near identical development timeframe for both operating systems, with a beta copy of both released earlier this year at the same time. Microsoft confirmed this week that the company will ship Windows 8 in a trio of editions, including Windows 8, Windows 8 Pro, and Windows 8 Enterprise. Special local language-only editions of Windows 8 will also be released in select emerging markets like China. The big naming news of the week was the company's decision to name its ARM edition of Windows 8 as Windows RT. Known previously as Windows on ARM or WOA, the single edition will only be available pre-installed on PCs and tablets with ARM processors. Microsoft has not yet announced any intentions for an ARM Windows Server edition yet, despite some OEMs exploring ARM server options recently.

Windows Server 2012

Configure IP Address and DNS using Command Prompt

Netsh IP Address
In order to configure TCP/IP settings such as the IP address, Subnet Mask, Default Gateway, DNS and WINS addresses and many other options you can use Netsh.exe. The requested operation requires elevation (Run as administrator).

The IP address of your computer can be set from the command prompt by running the following commands at an administrative level prompt:

netsh interface ip set address name="Local Area Connection" static 146.40.202.222 255.255.255.0 146.40.202.1 1

Netsh interface set ip address

Local Area Connection is the name of the adapter you want to modify. In single NIC systems it is normally called Local Area Connection.
146.40.202.222 is the IP address you want to set.
255.255.255.0 is the subnet mask.
146.40.202.1 is the gateway.
1 is the gateway metric. You can leave this as 1 for almost all cases.

If you want to enable DHCP you can run:
netsh interface ip set address name="Local Area Connection" dhcp

There are two commands for DNS since administrators typically configure a primary and secondary DNS server.
For the primary DNS run:
netsh interface ip set dns name="Local Area Connection" static 146.40.202.9

For the secondary run:
netsh interface ip add dns name="Local Area Connection" 146.40.203.9 index=2

Local Area Connection

If you want to configure the computer to use DNS from DHCP run:
netsh interface ip set dnsservers name="Local Area Connection" source=dhcp

When you are finished with all of your IP and DNS changes run ipconfig -all to review the new settings.

Enable Telnet with only one command

Command-Telnet
Enable Telnet with only one command... Starting with Windows Vista, Windows 7 and ....., Microsoft no longer includes the telnet command installed by default. It is still available but must be installed or enabled by the user. The normal way to enabled additional features is through the “Turn Windows features on or off” window found in Control Panel. This accomplishes the task but can be annoying when you are working in Command Prompt and need to use the telnet command right away.
Instead of going to Control Panel, there is a better way. At an administrative level command prompt, simply run:

dism /online /Enable-Feature /FeatureName:TelnetClient

Telnet will be available immediately after the dism command has completed running.

Command-Telnet

Monday, April 23, 2012

Solving the Problem

       Many device or network problems are straightforward to resolve, but others yield misleading symptoms. If one solution does not work, continue with another.
A solution often involves:
  • Upgrading software or hardware (for example, upgrading to a new version of agent software or installing Gigabit Ethernet devices)
  • Balancing your network load by analyzing:
    • What users communicate with which servers
    • What the user traffic levels are in different segments
Based on these findings, you can decide how to redistribute network traffic.
  • Adding segments to your LAN (for example, adding a new switch where utilization is continually high)
  • Replacing faulty equipment (for example, replacing a module that has port problems or replacing a network card that has a faulty jabber protection mechanism)
To help solve problems, have available:
  • Spare hardware equipment (such as modules and power supplies), especially for your critical devices
  • A recent backup of your device configurations to reload if flash memory gets corrupted (which can sometimes happen due to a power outage)
Why do we investigate incidents the key purpose of an investigation should be
     - to preven a future recurrence of the incident
     - determine root cause to prevent similar losses at the same or another location
     - satisfy legal & company requirements and determine the company's liability
     - benefit from lessons learned which may result in improved safety and operation
     - inform employees by keep employees informed about the event and follow up action

Sunday, April 22, 2012

Identifying and Testing the Cause of the Problem

      After you develop a theory about the cause of the problem, test your theory. The test must conclusively prove or disprove your theory.

Two general rules of troubleshooting are:

  • If you cannot reproduce a problem, then no problem exists unless it happens again on its own.
  • If the problem is intermittent and you cannot replicate it, you can configure your network management software to catch the event in progress.
      For example, with"LANsentry Manager", you can set alarms and automatic packet capture filters to monitor your network and inform you when the problem occurs again. See"Configuring Transcend NCS" for more information.

      Although network management tools can provide a great deal of information about problems and their general location, you may still need to swap equipment or replace components of your network until you locate the exact trouble spot.

      After you test your theory, either fix the problem as described in"Solving the Problem" or develop another theory.

Sample Problem Analysis
       This section illustrates the analysis phase of a typical troubleshooting incident. On your network, a user cannot access the mail server. You need to establish two areas of information:
  • What you know - In this case, the user's workstation cannot communicate with the mail server.
  • What you donot know and need to test-
  • Can the workstation communicate with the network at all, or is the problem limited to communication with the server? Test by sending a"Ping" or by connecting to other devices.
  • Is the workstation the only device that is unable to communicate with the server, or do other workstations have the same problem? Test connectivity at other workstations.
  • If other workstations cannot communicate with the server, can they communicate with other network devices? Again, test the connectivity.
The analysis process follows these steps:
  1. Can the workstation communicate with any other device on the subnetwork?• Ifno, then go to step 2.
    • Ifyes, determine if only the server is unreachable.
    • If only the server cannot be reached, this suggests a server problem. Confirm by doing step 2.
    • If other devices cannot be reached, this suggests a connectivity problem in the network. Confirm by doing step 3.
  2. Can other workstations communicate with the server?
    • Ifno, then most likely it is a server problem. Go to step 3.
    • Ifyes, then the problem is that the workstation is not communicating with the subnetwork. (This situation can be caused by workstation issues or a network issue with that specific station.)
  3. Can other workstations communicate with other network devices?• Ifno, then the problem is likely a network problem.
    • Ifyes, the problem is likely a server problem.
When you determine whether the problem is with the server, subnetwork, or workstation, you can further analyze the problem, as follows:
  • For a problem with the server - Examine whether the server is running, if it is properly connected to the network, and if it is configured appropriately.
  • For a problem with the subnetwork - Examine any device on the path between the users and the server.
  • For a problem with the workstation - Examine whether the workstation can access other network resources and if it is configured to communicate with that particular server.

Equipment for TestingTo help identify and test the cause of problems, have available:
  • A laptop computer that is loaded with a terminal emulator, TCP/IP stack, TFTP server, CD-ROM drive (to read the online documentation), and some key network management applications, such as LANsentry Manager. With the laptop computer, you can plug into any subnetwork to gather and analyze data about the segment.
  • A spare managed hub to swap for any hub that does not have management. Swapping in a managed hub allows you to quickly spot which port is generating the errors.
  • A single port probe to insert in the network if you are having a problem where you do not have management capability.
  • Console cables for each type of connector, labeled and stored in a secure place.

Understanding the Problem

      Networks are designed to move data from a transmitting device to a receiving device. When communication becomes problematic, you must determine why data are not traveling as expected and then find a solution. The two most common causes for data not moving reliably from source to destination are:
  • The physical connection breaks (that is, a cable is unplugged or broken).
  • A network device is not working properly and cannot send or receive some or all data.
       Network management software can easily locate and report a physical connection break (layer 1 problem). It is more difficult to determine why a network device is not working as expected, which is often related to a layer 2 or a layer 3 problem.

To determine why a network device is not working properly, look first for:
  •  Valid service - Is the device configured properly for the type of service it is supposed to provide? For example, has Quality of Service (QoS), which is the definition of the transmission parameters, been established?
  • Restricted access - Is an end station supposed to be able to connect with a specific device or is that connection restricted? For example, is a firewall set up that prevents that device from accessing certain network resources?
  • Correct configuration - Is there a misconfiguration of IP address, subnet mask, gateway, or broadcast address? Network problems are commonly caused by misconfiguration of newly connected or configured devices.