Learn some helpful IT Administrator tips and tricks.

Welcome to the most comprehensive list of tips and tricks for IT field, you'll find anywhere on the internet. I hope these tips help you get the most out of your internet.

Cloud Computing Next Generation of your company

Benefits of cloud computing is increased efficiency; services are rapidly deployed and ready for use in your company. Find out about the benefits of moving your business to cloud computing....

Support Tips and Tricks

Tips and Tricks for. Learning Before. Helping. Learning. Service. Research Computing... We are ...

Server, Network, System, Application | Diagram

Client-side Examples; Server-side Examples; Client-side Advantages ... this concept is to view the following diagram and considering some examples: ...

Good roadmap for System Engineer, Network Engineer

Roadmap global customer support professionals are focused on crucial, quick issue resolution and uninterrupted service.. HOW?

Saturday, March 9, 2013

How to logoff remote desktop via Terminal Server Commands "Query session | Reset session"

This is just a quick guide to check the error message "The terminal server has exceeded the maximum number of allowed connections" that you can use this command to figure out what sessions are connected to the server.

Use this command to display information about administrative and client node sessions: query session /server:yourcomputer
commnad check RDP

To reset the session of user1 by using the session name:
reset session rdp-tcp#1

To reset the session of user1 by using the session ID:
reset session 1

How to enable ping response in Windows Server with commandline

This is just a quick guide to enabling a server to respond to ping, the default setting in Windows Server is to disable. I would like to recommend this command "Netsh firewall set icmpsetting 8". While running this command, just wait since it takes a little time and this is the result:,
Netsh firewall set icmpsetting 8 disable

Once enabled you can also simply disable the ping utility also by repeating the same above steps the only difference would be the command name. Open the command prompt in Administrator mode as described earlier. You will have to type “Netsh firewall set icmpsetting 8 disable” in the command prompt.

How to find MAC address... either locally or across a network

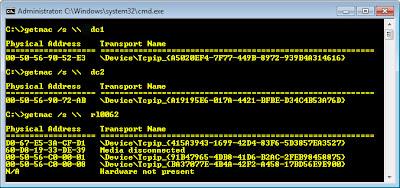
Getmac | I would like to recommend this parameter "getmac /s \\remotecomputer", it helps you can remote to other PCs easily. While running this command, just wait since it takes a little time and this is the result:,
getmac command

Returns the media access control (MAC) address and list of network protocols associated with each address for all network cards in each computer, either locally or across a network.
getmac
getmac /v


Note: export the output by using this command getmac /s \\remotecomputer >> c:\getmacresult.txt

Commands Every Administrator Should Know "Driverquery"

Driverquery = Displays a list of all installed device drivers and their properties. I would like to recommend this parameter "driverquery /s \\remotecomputer" , it helps you can remote to other PCs easily

Incorrect device drivers can lead to any number of system problems. If you want to see which drivers are installed on a Windows system, you can do so by running the driverquery tool. This simple command-line tool provides information about each driver that is being used. The command is:
driverquery
Driverquery

If you need a bit more information, you can append the -v switch. Another option is to append the -si switch, which causes the tool to display signature information for the drivers. Here’s how they look:

driverquery -v
driverquery -si
driverquery /nh

Note: Sample command with export the result... driverquery /s \\remotecomputer >> c:\driverresult.txt

Saturday, September 22, 2012

How to Copy Path of a File to the Clipboard in Windows 7 or Vista

How to Copy Path of a File to the Clipboard in Windows 7 or Vista
Windows Vista and 7 provides a very useful option "Copy as Path" which appears whenever you right-click on a file/folder. All you have to do is hold down the shift key, and right-click the file... Choose the Copy as Path from the menu. This option automatically copies the full path of selected file/folder which can be used anywhere else.


Here’s an example of what’s on the clipboard after clicking that:
Copy Path of a File to the Clipboard

“"E:\CVX Mail\Mail 2007.pst"”

Note: This will also allow you to copy the path of a folder, file, image, ..... to the clipboard.

SQL Server: Installing Microsoft SQL Server 2012 On Windows 2008R2 (SP1) System

SQL Server 2012
   This is a simple step-by-step guide to installing Microsoft's newest version of SQL Server with Reporting Services in stand-alone mode (the alternative is SharePoint Integrated, I'll deal with all the steps necessary to do that installation separately in a few days/weeks time).

   The first step is to install your Windows 2008R2 box and get it fully upgraded to the latest patch levels (SP1). Then you can run the setup.exe on the installation DVD;
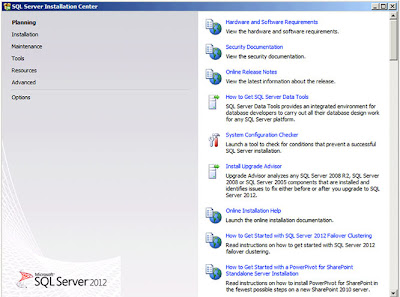
Installation Centre
SQL Server 2012: Installation Centre
Select "Installation" from the list of options on the left;
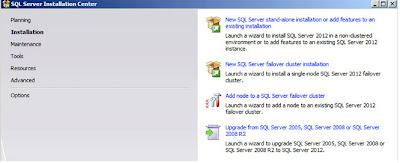
Installation Options
SQL Server 2012: Installation Options
Select "New SQL Server stand-alone installation ..." which is the top option on the right. After a few seconds wait (but I guess that probably depends on the speed and power of your system!) the following dialog appears;

Setup Support Rules
SQL Server 2012: Setup Support Rules
The installation program has checked your system and, on the system I'm using, found nothing that prevents the installation from proceeding. If you are interested in seeing the "Detailed Report". Once you've got a good set of passes click "OK". A "please wait" dialog will appear and after a few seconds the next dialog;
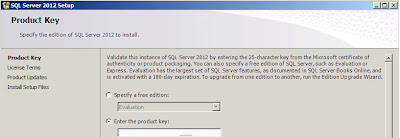
Product Key
SQL Server 2012: Product Key
You now need to enter your Product Key. If you are using the MSDN edition then it will be pre-populated, if you don't have one when you can just select one of the "Free" editions. Once you've entered the details click "Next";
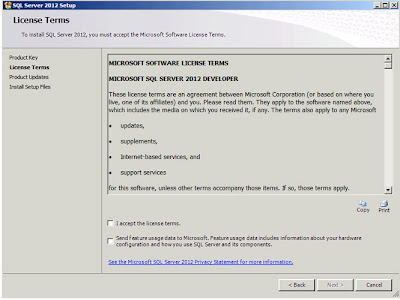
License Terms
SQL Server 2012: License Terms
No installation process would be complete without a 20-page Licensing Agreement and this one is no different. After you've read the entire document (you do do that right? *cough*) click on the "I accept the license terms". I also select the "Send feature usage data to Microsoft" and if you don't you'll only have yourself to blame when the features I use and tell them about are prioritised for improvement and the features you use but keep secret about aren't ... ;-) Click "Next";
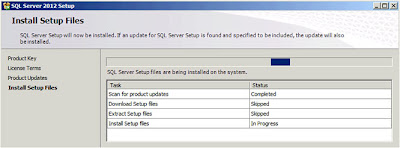
Install Setup Files
SQL Server: Install Setup Files
This dialog will only appear for a few seconds, as soon as the installation files have been successfully installed you are presented with the next dialog;
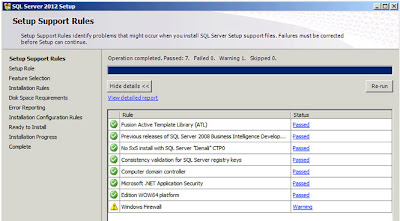
Setup Support Rules
SQL Server: Setup Support Rules
Again I've made the Detailed Report for this check available via Google Docs here. As you'll see there is one Warning related to the "Windows Firewall", I'm going to ignore this and just move on. Click "Next";
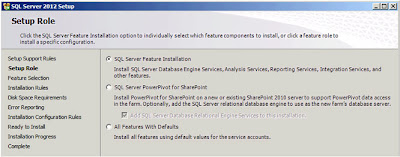
Setup Role
SQL Server: Setup Role
The default option, "SQL Server Feature Installation" is the one I'm after so I'll just click "Next";
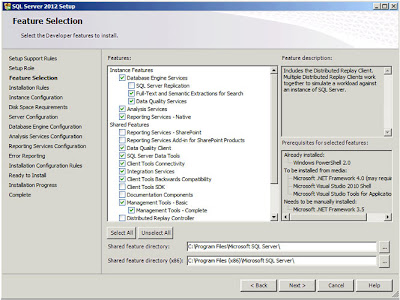
Feature Selection
SQL Server: Feature Selection
And this is the part where things start to get complicated. What exactly do you want your SQL Server to be doing? I'm going to install pretty much everything except the SharePoint integrated features (the first two shared features; Reporting Services - SharePoint, and Reporting Services Add-in for SharePoint Products). Click "Next";
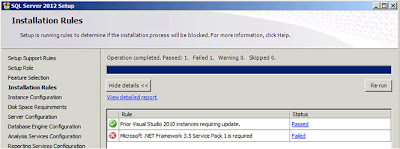
Installation Rules
SQL Server: Installation Rules
So we now have another check, the third, to make sure the system is capable of running the options I've selected. And now it "Failed" as "Microsoft .NET Framework 3.5 Service Pack 1 is required". The instructions for enabling this feature I have also blogged about, click here. When I did this no-reboot was required. After you've enabled the feature click on "Re-run" in the dialog;
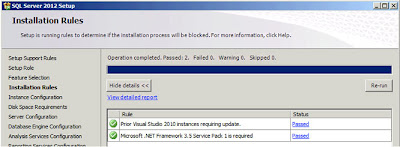
Installation Rules (Attempt 2)
SQL Server: Installation Rules (Attempt 2)
As you can see the check that had previously failed has now passed. The Detailed log is available (via Google Docs) here. Click "Next";
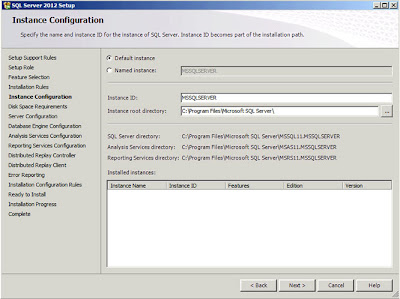
Instance Configuration
SQL Server: Instance Configuration
There isn't anything here I need to change so just click "Next". There will be a brief pause while the installation program checks to see if sufficient disk space exists to install the options you have selected. After a few seconds a report will be displayed;

Disk Space Requirements
SQL Server: Disk Space Requirements
Click "Next";

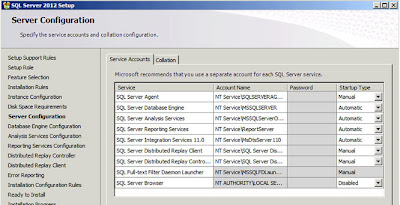
Server Configuration
SQL Server: Server Configuration
It's pretty unlikely that you'll want to change anything here (all these are services you can always change later). The one thing you might want to check if you are deploying to non-English customers is that the correct options are selected under the "Collation" tab - this is especially true if your system will be used to store multi-byte data such as Chinese, Japanese, Korean, etc. characters. Click "Next" when you're done;
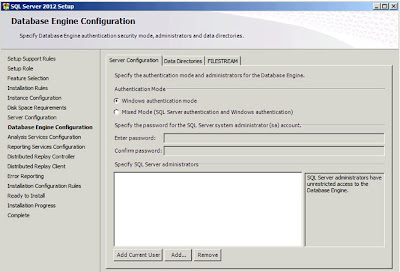
Database Engine Configuration
SQL Server: Database Engine Configuration
I always use "Windows authentication". I usually add in a few AD groups representing the entire company (we are an IT Service company) on the basis that I never know who I might want to share it with. This is your chance to secure the system either as tightly or loosely as you wish. Click "Next";
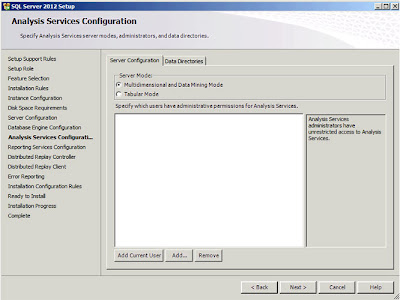
Analysis Services Configuration
SQL Server: Analysis Services Configuration
And the same again really. You need to enter the users who will have access to the Analysis Services. Once you're happy with this click "Next";
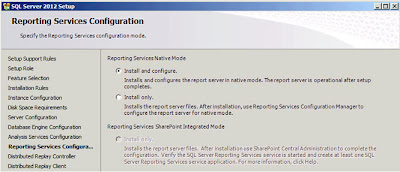
Reporting Services Configuration
SQL Server: Reporting Services Configuration
The default option, "Install and Configure", is the option I'm interested in so just click "Next";

Distributed Replay Controller
SQL Server: Distributed Replay Controller
Whilst appearing to be exactly the same as other "Pick the users" dialog box this one is subtly (invisibly!) different; you cannot select groups. If you try when you click "Next" you get an error;
The specified account 'XX\YYYY' for setting 'CTLRUSERS' is a group account. You can only use a user account. Add in the users for this feature and click "Next";

Distributed Replay Chat
SQL Server: Distributed Replay Chat
Enter the name of your controller (or leave blank) and then click "Next";
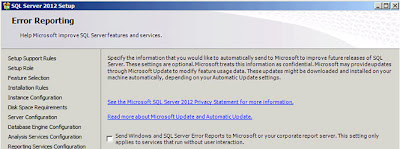
Error Reporting
SQL Server: Error Reporting
 I always check this check box (to send error reports to Microsoft) so that errors I encountered will hopefully be dealt with in future releases! Click "Next" when you're done and another round of checks will be executed and after a few seconds you will be presented with a report;


Installation Configuration Rules
SQL Server: Installation Configuration Rules
Click "Next";

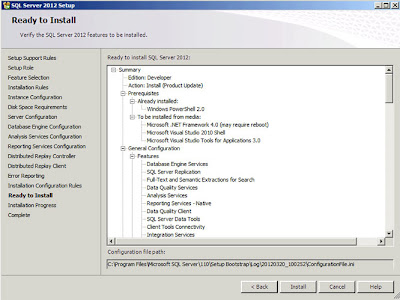
Ready To Install
SQL Server: Ready To Install
Click "Install" to begin the install process. The installation itself on the development system I was using took around 25/30 minutes. After the install is complete you will see the following dialog;

Computer Restart Required
SQL Server: Computer Restart Required
 Click "OK" and under this is the final installation report;
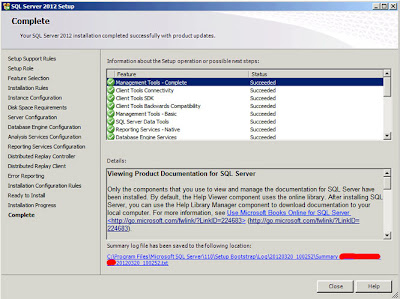
Complete (Install Report)
SQL Server: Complete (Install Report)

A restart is required, after the restart running Internet Explorer and pointing to the the SQL Server Reporting Services URL will (after logging in) take you to the standard webpage.

Windows 2008R2: Installing .NET Framework (Enabling the Feature)

Installing .NET Framework
     2008R2 includes the .NET Framework as a feature that needs to be turned on when required. Numerous installation programs (for example SQL Server 2012) require it and will mostly just error and tell you to turn the feature on.

     The blog post is intended as a step-by-step guide to switching the feature on.

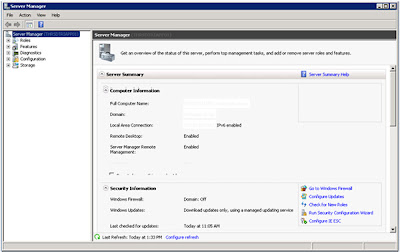
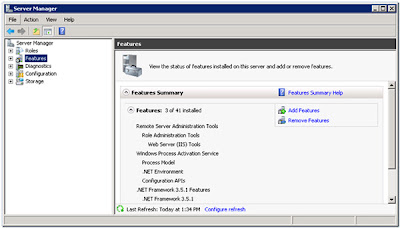
     Go to the start menu and type "Feature" into the search box, choose the option "Turn Windows Features on or off". The Server Manager will then be displayed;


2008R2: Server Manager
Windows 2008r2: Features
    Click on "Features" in the tree-view on the left;

Windows 2008r2: Select Features Dialog
     If you already have any features installed they will be listed here. Click on "Add Features" on the right;     Expand the top node in the list (.NEW Framework 3.5.1 Features) and select the first item ".NET Framework 3.5.1). Click "Next";


2008R2: Select Features Dialog
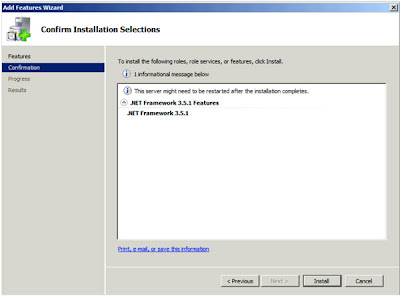
Windows 2008r2: Confirm Installation Selections
    Expand the top node in the list (.NEW Framework 3.5.1 Features) and select the first item ".NET Framework 3.5.1). Click "Next";

2008R2: Confirm Installation Selections
Windows 2008r2: Confirm Installation Selections
    Click "Install", the next dialog actually shows the installation process which should take about 30 seconds (depending on how powerful your system is!) then you will see the following;

2008R2: Installation Results
Windows 2008r2: Installation Results
    Presuming you have "Installation succeeded" in the dialog click on "Close" to complete the process.

Wednesday, July 18, 2012

How to use GPO to remotely install software in Windows Server 2008

       You can use Group Policy to assign or to publish software to users or computers in a domain. Additionally, it is useful to be able to deploy software based on group membership. A Group Policy object (GPO) is usually applied only to members of an organizational unit (OU) to which the GPO is linked.

Create a Distribution Point
       To publish or assign a computer program, you must create a distribution point on the publishing server:
  1. Log on to the server computer as an administrator.
  2. Create a shared network folder where you will put the Microsoft Windows Installer package (.msi file) that you want to distribute.
  3. Set permissions on the share to allow access to the distribution package.
  4. Copy or install the package to the distribution point. For example, to distribute Microsoft Office XP, run the administrative installation (setup.exe /a) to copy the files to the distribution point.
Assign a Package
       To assign a program to computers that are running Windows Server 2003, Windows 2000, or Microsoft Windows XP Professional, or to users who are logging on to one of these workstations:
  1. Start the Active Directory Users and Computers snap-in. To do this, click Start, point to Administrative Tools, and then click Active Directory Users and Computers.
  2. In the console tree, right-click your domain, and then click Properties.
  3. Click the Group Policy tab, select the group policy object that you want, and then click Edit.
  4. Under Computer Configuration, expand Software Settings.
  5. Right-click Software installation, point to New, and then click Package.
  6. In the Open dialog box, type the full Universal Naming Convention (UNC) path of the shared installer package that you want. For example, \\file server\share\file name.msi.

    Important Do not use the Browse button to access the location. Make sure that you use the UNC path to the shared installer package.
  7. Click Open.
  8. Click Assigned, and then click OK. The package is listed in the right pane of the Group Policy window.
  9. Close the Group Policy snap-in, click OK, and then quit the Active Directory Users and Computers snap-in.
  10. When the client computer starts, the managed software package is automatically installed.

Publish a Package
       To publish a package to computer users and make it available for installation from the Add or Remove Programs tool in Control Panel:
  1. Start the Active Directory Users and Computers snap-in. To do this, click Start, point to Administrative Tools, and then click Active Directory Users and Computers.
  2. In the console tree, right-click your domain, and then click Properties.
  3. Click the Group Policy tab, click the group policy object that you want, and then click Edit.
  4. Under User Configuration, expand Software Settings.
  5. Right-click Software installation, point to New, and then click Package.
  6. In the Open dialog box, type the full UNC path of the shared installer package that you want. For example, \\file server\share\file name.msi.
    Important Do not use the Browse button to access the location. Make sure that you use the UNC path to the shared installer package.
  7. Click Open.
  8. Click Publish, and then click OK.
  9. The package is listed in the right pane of the Group Policy window.
  10. Close the Group Policy snap-in, click OK, and then quit the Active Directory Users and Computers snap-in.
  11. Test the package:
Note Because there are several versions of Microsoft Windows, the following steps may be different on your computer. If they are, see your product documentation to complete these steps.
         a. Log on to a workstation that is running Windows Vista or Windows 7 by using an account that you published the package to.
         b.In Windows 7, click Start, and then click Control Panel.
         c.Double-click Program and Feature, and then click Add New Programs.
         d.In the Add programs from your network list, click the program that you published, and then click Add. The program is installed.
         e.Click OK, and then click Close.

Note if you upgrade or modify the package, you can redeploy a software package

force proxy setting via group policy(GPO)

       We are using GPOs to apply proxy settings in our domain. Works fine and gives us the flexibility we need. GPOs are applied at system startup or user login. Take a look into the refresh policy. Changed GPOs will not be applied before the refresh interval takes place (in case the user remains logged in).

This article describes how to force proxy setting via group policy.
  • Click StartAll programs – Administrative Tools – Group Policy Management.
  • Create or Edit Group Policy Objects.
  • Expand User configurationPoliciesWindows SettingsInternet Explorer MaintenanceConnection.
  • In right Pane Proxy Settings.

For some security reasons maybe administrator need to prevent end users from change their proxy settings. You can do it with group policy follow this steps:
  • Click StartAll programs – Administrative Tools – Group Policy Management.
  • Create or Edit Group Policy Objects.
  • Expand Computer Configuration – Administrative Templates – Windows Components - Internet Explorer – Internet Control Panel
  • In right Pane Disable the Connections page (Enabled)
       Removes the Connections tab from the interface in the Internet Options dialog box. If you enable this policy, users are prevented from seeing and changing connection and proxy settings. If you disable this policy or do not configure it, users can see and change these settings. When you set this policy, you do not need to set the following policies for the Connections tab, because this policy removes the Connections tab from the interface
Use GPORESULT (resource kit) to check if a GPO will be applied or not.

More info...

How to Disable USB Storage Devices ports in Windows 7

      USB storage devices are so common these days almost everyone owns USB storage device in shape of small flash drives, external hard disks, mobile phones, cameras, and lots of other portable devices. So if you want to secure your computer from stealing data, viruses or any other risks then simply disable the USB ports for USB storage devices / disk drives. To block the USB storage devices just follow the given steps below.

Note: this method just block the USB drives (Flash drives, External HDD, Mobile Phones, etc.) not the USB mouse, Keyboard, etc.


How to Disable USB ports
Press Windows + R from keyboard, type “regedit” in the “Run” window and hit Enter.

Explore the registry editor folders
 HKEY_LOCAL_MACHINE\SYSTEM\CurrentControlSet\Services\USBSTOR
in the right pane double click to open “Start” DWORD value as shown below.

Change its value to 4 and click “OK” button to save changes. Close the registry editor and plug in any USB storage device to check.